固定ヘッダー付きのリストを作る方法を説明しています。
本記事では、リストの作成にRecyclerViewコンポーネントを使用しています。基本的な使い方は以下の記事にまとめていますので、こちらもご覧ください。
実装概要
以下のコンポーネントを組み合わせます。
- LinearLayout
ヘッダーを作る - RecyclerView
リストを作る
ヘッダーとリストで項目ごとに横幅を同じにして、ヘッダー付きのリストに見えるようにします。
実装例
レイアウト
activity_main.xml
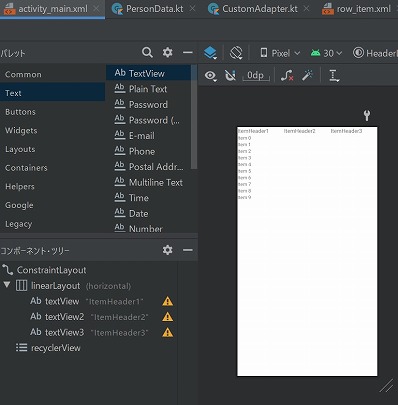
メインアクティビティのレイアウトです。
上からLinearLayout(中にTextView)、RecyclerViewを配置しています。

ヘッダーに使用するTextViewの幅は固定にしておかないと、リスト内項目の幅と合わなくなります。よって、layout_width=”0dp”、layout_weight=”1″にしています。
※特定の項目の幅を広げたい・狭くしたい場合は、layout_weightの値を変えて調整します。
<LinearLayout
    android:id="@+id/linearLayout"
    android:layout_width="match_parent"
    android:layout_height="wrap_content"
    android:orientation="horizontal"
    app:layout_constraintTop_toTopOf="parent">

    <TextView
        android:id="@+id/textView"
        android:layout_width="0dp"
        android:layout_height="wrap_content"
        android:layout_weight="1"
        android:textSize="16sp"
        android:text="ItemHeader1" />

    <TextView
        android:id="@+id/textView2"
        android:layout_width="0dp"
        android:layout_height="wrap_content"
        android:layout_weight="1"
        android:textSize="16sp"
        android:text="ItemHeader2" />

    <TextView
        android:id="@+id/textView3"
        android:layout_width="0dp"
        android:layout_height="wrap_content"
        android:layout_weight="1"
        android:textSize="16sp"
        android:text="ItemHeader3" />
</LinearLayout>

<androidx.recyclerview.widget.RecyclerView
    android:id="@+id/recyclerView"
    android:layout_width="match_parent"
    android:layout_height="0dp"
    app:layout_constraintTop_toBottomOf="@id/linearLayout"/>
row_item.xml
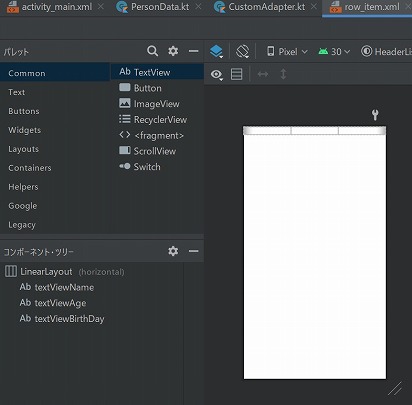
リスト項目のレイアウトで、すべての行において共通で使用されます。
ヘッダーで用意した項目分のTextViewを横並びで配置します。

ヘッダーの設定と同じく、TextViewはlayout_width=”0dp”、layout_weight=”1″とします。
※layout_weightの値を調整した場合は、同じ値にします。
<LinearLayout xmlns:android="http://schemas.android.com/apk/res/android"
    android:layout_width="match_parent"
    android:layout_height="wrap_content">

    <TextView
        android:id="@+id/textViewName"
        android:layout_width="0dp"
        android:layout_height="wrap_content"
        android:layout_weight="1"
        android:textSize="16sp"
        android:text="" />

    <TextView
        android:id="@+id/textViewAge"
        android:layout_width="0dp"
        android:layout_height="wrap_content"
        android:layout_weight="1"
        android:textSize="16sp"
        android:text="" />

    <TextView
        android:id="@+id/textViewBirthDay"
        android:layout_width="0dp"
        android:layout_height="wrap_content"
        android:layout_weight="1"
        android:textSize="16sp"
        android:text="" />
</LinearLayout>
実行結果
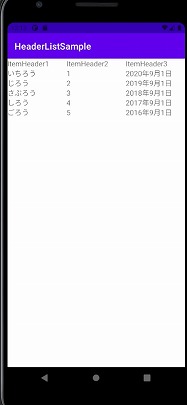
各項目の幅が適切に設定されていれば以下のように、ヘッダー付きのリストが表示されます。

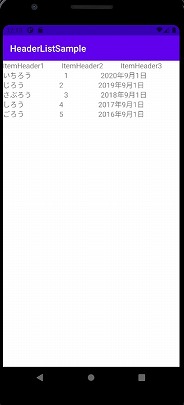
幅の設定が誤っていると、以下のようにヘッダーとリスト内項目の位置がずれてしまいますので、誤りがないか確認しましょう。

まとめ
ヘッダー付きのリストを作る方法を説明しました。
ヘッダーとリストで項目ごとに横幅を同じにすることで、疑似的にヘッダー付きリストを作成しました。他にもヘッダーを表示する方法はありますが、一緒にスクロールされたり、リスト内項目と幅を合わせることが難しくなっています。
複数列の固定ヘッダーを付けたい場合は、今回説明した方法が最も簡単な実装方法です。


