実際にアプリを作成してみます。
今回は足し算・引き算を行う電卓を簡単に作っていきます。
ちゃんとした電卓を作るのは結構大変なので、ざっくりと作っていきます。
実装
レイアウト
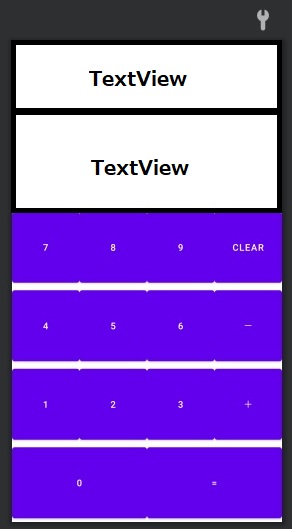
画面を作っていきます。
テーブルの作り方についてはこちらで解説しています。
用意するコンポーネント
- TextView×2
計算過程表示、入力値・計算結果表示 - ボタン×14
0~9、CLEAR、+、-、=
デザイン機能で以下のように配置していきます。
<TableLayout
    android:layout_width="match_parent"
    android:layout_height="match_parent"
    app:layout_constraintBottom_toBottomOf="parent"
    app:layout_constraintEnd_toEndOf="parent">

    <TableRow
        android:layout_width="match_parent"
        android:layout_height="match_parent"
        android:layout_weight="1">

        <TextView
            android:id="@+id/textTemp"
            android:layout_width="wrap_content"
            android:layout_height="match_parent"
            android:layout_weight="1"
            android:layout_span="4" />
    </TableRow>

    <TableRow
        android:layout_width="match_parent"
        android:layout_height="match_parent"
        android:layout_weight="2">

        <TextView
            android:id="@+id/textResult"
            android:layout_width="wrap_content"
            android:layout_height="match_parent"
            android:layout_weight="1"
            android:layout_span="4" />
    </TableRow>

    <TableRow
        android:layout_width="match_parent"
        android:layout_height="match_parent"
        android:layout_weight="1">

        <Button
            android:id="@+id/button7"
            android:layout_width="match_parent"
            android:layout_height="match_parent"
            android:layout_weight="1"
            android:text="7" />

        <Button
            android:id="@+id/button8"
            android:layout_width="match_parent"
            android:layout_height="match_parent"
            android:layout_weight="1"
            android:text="8" />

        <Button
            android:id="@+id/button9"
            android:layout_width="match_parent"
            android:layout_height="match_parent"
            android:layout_weight="1"
            android:text="9" />

        <Button
            android:id="@+id/buttonClear"
            android:layout_width="match_parent"
            android:layout_height="match_parent"
            android:layout_weight="1"
            android:text="Clear" />

    </TableRow>

    <TableRow
        android:layout_width="match_parent"
        android:layout_height="match_parent"
        android:layout_weight="1">

        <Button
            android:id="@+id/button4"
            android:layout_width="match_parent"
            android:layout_height="match_parent"
            android:layout_weight="1"
            android:text="4" />

        <Button
            android:id="@+id/button5"
            android:layout_width="match_parent"
            android:layout_height="match_parent"
            android:layout_weight="1"
            android:text="5" />

        <Button
            android:id="@+id/button6"
            android:layout_width="match_parent"
            android:layout_height="match_parent"
            android:layout_weight="1"
            android:text="6" />

        <Button
            android:id="@+id/buttonSub"
            android:layout_width="match_parent"
            android:layout_height="match_parent"
            android:layout_weight="1"
            android:text="-" />

    </TableRow>

    <TableRow
        android:layout_width="match_parent"
        android:layout_height="match_parent"
        android:layout_weight="1">

        <Button
            android:id="@+id/button1"
            android:layout_width="match_parent"
            android:layout_height="match_parent"
            android:layout_weight="1"
            android:text="1" />

        <Button
            android:id="@+id/button2"
            android:layout_width="match_parent"
            android:layout_height="match_parent"
            android:layout_weight="1"
            android:text="2" />

        <Button
            android:id="@+id/button3"
            android:layout_width="match_parent"
            android:layout_height="match_parent"
            android:layout_weight="1"
            android:text="3" />

        <Button
            android:id="@+id/buttonAdd"
            android:layout_width="match_parent"
            android:layout_height="match_parent"
            android:layout_weight="1"
            android:text="+" />

    </TableRow>

    <TableRow
        android:layout_width="match_parent"
        android:layout_height="match_parent"
        android:layout_weight="1">

        <Button
            android:id="@+id/button0"
            android:layout_width="match_parent"
            android:layout_height="match_parent"
            android:layout_weight="1"
            android:text="0" />

        <Button
            android:id="@+id/buttonResult"
            android:layout_width="match_parent"
            android:layout_height="match_parent"
            android:layout_weight="1"
            android:text="=" />

    </TableRow>
</TableLayout>
アクティビティ
ロジック
今回は、足し算・引き算のみなので、優先順位を気にせず前方から順に計算していきます。
- 計算式の入力
数字、演算子をリストに格納していく。
→演算子入力時にリストに格納する。 - 演算
以下の計算を演算子の数分繰り返し行う。
①x = 数字[0] + 数字[1] or 数字[0] – 数字[1]
②数字[0] = x
③数字[1]を削除
「1+2+3+4+5」と入力して計算した場合、以下のような流れになります。
| 計算回数 | 計算結果 | リストの値 |
|---|---|---|
| 初期値 | – | 1,2,3,4,5 |
| 1回目 | 1+2=3 | 3,3,4,5 |
| 2回目 | 3+3=6 | 6,4,5 |
| 3回目 | 6+4=10 | 10,5 |
| 4回目 | 10+5 | 15 (計算結果) |
ソースコード
MainActivityファイルに処理を書いていきます。
大きく分けると以下の処理が必要となります。
- アクティビティ開始時の処理
初期処理、イベントリスナの設定 - 数字ボタンを押したときの処理
画面への入力 - 数字以外のボタンを押したときの処理
計算式の作成、計算結果の表示
今回作成したソースでは、Int型の最大値を超える計算を行うと正しい計算が出来ません。
class MainActivity : AppCompatActivity() {
    companion object {
        lateinit var textResult: TextView
        lateinit var textTemp: TextView
        var clickedNum = mutableListOf<Int>()
        var clickedOpe = mutableListOf<Int>()
        const val MAX_LENGTH = 9
    }

    override fun onCreate(savedInstanceState: Bundle?) {
        super.onCreate(savedInstanceState)
        setContentView(R.layout.activity_main)

        //TextViewコンポーネントの取得
        textResult = findViewById(R.id.textResult)
        textTemp = findViewById(R.id.textTemp)

        //クリックイベントのインスタンス化
        val numberButtonClick = NumberButtonClick()
        val opeButtonClick = OpeButtonClick()

        //ボタンコンポーネントの取得
        val button0: Button = findViewById(R.id.button0)
        val button1: Button = findViewById(R.id.button1)
        val button2: Button = findViewById(R.id.button2)
        val button3: Button = findViewById(R.id.button3)
        val button4: Button = findViewById(R.id.button4)
        val button5: Button = findViewById(R.id.button5)
        val button6: Button = findViewById(R.id.button6)
        val button7: Button = findViewById(R.id.button7)
        val button8: Button = findViewById(R.id.button8)
        val button9: Button = findViewById(R.id.button9)
        val buttonClear: Button = findViewById(R.id.buttonClear)
        val buttonAdd: Button = findViewById(R.id.buttonAdd)
        val buttonSub: Button = findViewById(R.id.buttonSub)
        val buttonResult: Button = findViewById(R.id.buttonResult)

        //各ボタンにクリックリスナを設定
        button0.setOnClickListener(numberButtonClick)
        button1.setOnClickListener(numberButtonClick)
        button2.setOnClickListener(numberButtonClick)
        button3.setOnClickListener(numberButtonClick)
        button4.setOnClickListener(numberButtonClick)
        button5.setOnClickListener(numberButtonClick)
        button6.setOnClickListener(numberButtonClick)
        button7.setOnClickListener(numberButtonClick)
        button8.setOnClickListener(numberButtonClick)
        button9.setOnClickListener(numberButtonClick)
        buttonClear.setOnClickListener(opeButtonClick)
        buttonAdd.setOnClickListener(opeButtonClick)
        buttonSub.setOnClickListener(opeButtonClick)
        buttonResult.setOnClickListener(opeButtonClick)

    }

    class NumberButtonClick() : View.OnClickListener {
        override fun onClick(v: View?) {
            if (v != null) {
                //クリックされたボタンを取得
                val button: Button = v.findViewById(v.id)

                //最大文字数を越えていない場合のみ入力を受け付ける
                if(textResult.text.length < MAX_LENGTH) {
                    if (Integer.parseInt(button.text.toString()) <= 9) {
                        if (textResult.text.isEmpty()) {
                            textResult.text = button.text
                        } else {
                            if (textResult.text.equals("0")) {
                                //0始まりの場合は連続で入力させない
                                textResult.text = button.text
                            } else {
                                //それ以外は入力値を末尾に追加する
                                var tempStr = textResult.text.toString() + button.text
                                textResult.text = tempStr
                            }
                        }
                    }
                }
            }
        }
    }

    class OpeButtonClick() : View.OnClickListener {
        override fun onClick(v: View?) {
            if (v != null) {
                if(textResult.text.isNotEmpty()) {
                    //クリックされたボタンを取得
                    val button: Button = v.findViewById(v.id)

                    when (v.id) {
                        R.id.buttonAdd -> {
                            addTempText(button)
                        }
                        R.id.buttonSub -> {
                            addTempText(button)
                        }
                        R.id.buttonClear -> {
                            allClear()
                        }
                        R.id.buttonResult -> {
                            calcResult()
                        }
                        else -> {
                        }
                    }
                }
            }
        }

        private fun addTempText(button: Button) {
            clickedNum.add(Integer.parseInt(textResult.text.toString()))
            clickedOpe.add(button.id)

            var tempStr = textTemp.text.toString() +
                    textResult.text.toString() +
                    button.text.toString()
            textTemp.text = tempStr
            textResult.text = ""
        }

        private fun allClear() {
            textTemp.text = ""
            textResult.text = ""
            clickedNum.clear()
            clickedOpe.clear()
        }

        private fun calcResult() {
            clickedNum.add(Integer.parseInt(textResult.text.toString()))

            //入力値を前方から順に計算する
            clickedOpe.forEach { buttonId ->
                if(clickedNum.size > 1) {
                    val number1 = clickedNum[0]
                    val number2 = clickedNum[1]

                    when (buttonId) {
                        //計算結果を格納し直す
                        R.id.buttonAdd -> {
                            clickedNum[0] = number1 + number2
                        }
                        R.id.buttonSub -> {
                            clickedNum[0] = number1 - number2
                        }
                    }
                }

                //計算が終わった値を削除する
                clickedNum.removeAt(1)
            }

            //入力を初期化して計算結果を表示する
            textResult.text = clickedNum[0].toString()
            textTemp.text = ""
            clickedNum.clear()
            clickedOpe.clear()
        }
    }
}
まとめ
足し算・引き算のみを行う簡易な電卓を作成しました。
まずは、Android Studioや言語に慣れるために、書いてみると手っ取り早く覚えられます。
しっかり身につくまでは、こだわり過ぎず実践していくと良いでしょう。
実機にインストールする方法も紹介しています。