DialogからFragmentを操作する方法を説明しています。
基本的な考え方は↓こちらの、「FragmentからActivityを操作する」方法と同じです。
Fragmentの親子関係について
「Activity→DialogFragment(Fragment)」と「Fragment→DialogFragment(Fragment)」の大きな違いは、Fragment同士で親子関係が存在するという点です。
「(親)Fragment→(子)DialogFragment(Fragment)」の関係となります(親が呼び出し元、子が呼び出し先)。また、Fragmentには”parent〇〇”やchild〇〇”といった属性やメソッドが用意されているため、これにより参照できるようになっています。子Fragmentから親Fragmentを参照する場合は”parent〇〇”、親Fragmentから子Fragmentを参照する場合は”child〇〇”となります。
Activityの場合との違い
「Activity→Fragment」の場合
Fragmentで実行できるように、Activityを取得してメソッドを実行できるようにします。
override fun onAttach(context: Context) {
    super.onAttach(context)
    try {
        //MainActivity(呼び出し元)をListenerに変換する
        val mainActivity: MainActivity = activity as MainActivity
        listener = mainActivity
    } catch (e: ClassCastException) {
        throw ClassCastException((context.toString() +
                " must implement NoticeDialogListener"))
    }
}
「Fragment→DialogFragment(Fragment)」の場合
呼び出し元のFragment(親Fragment)を取得するようにします。親Fragmentのインスタンスは”parentFragment”により取得します。
override fun onAttach(context: Context) {
    super.onAttach(context)
    try {
        //parentFragment(呼び出し元)をListenerに変換する
        val fragment = parentFragment
        listener = fragment as CallbackListener
    } catch (e: ClassCastException) {
        throw ClassCastException((context.toString() +
                " must implement NoticeDialogListener"))
    }
}
実装例
レイアウト
activity_main.xml
メインアクテビティのレイアウトです。
画面一杯にFragmentを表示しています。
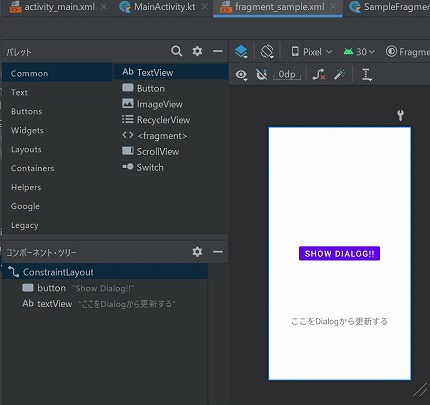
fragment_sample.xml
フラグメントのレイアウトです。
ボタンを押すとDaialogを表示、DialogのPositiveボタン(OKボタン)を押すとテキストの表示内容が変わります。
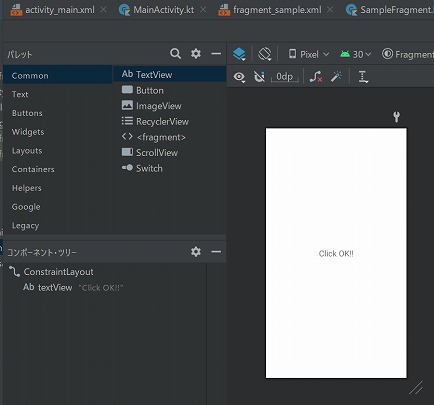
dialog_sample.xml
ダイアログのレイアウトです。
Positiveボタン(OKボタン)を押すと、フラグメントのテキスト表示内容を更新します。
実装方法
SampleFragment.kt
Dialogの表示とInterface(SampleDialogFragment.CallbackListener)で定義するメソッドの実装をしています。
class SampleFragment : Fragment()
    , SampleDialogFragment.CallbackListener {

    override fun updateButtonClickFromFragmentDialog() {
        val textView = view?.findViewById<TextView>(R.id.textView)
        if (textView != null) {
            textView.text = "Update From Dialog!!"
        }
    }

    override fun onCreateView(
        inflater: LayoutInflater,
        container: ViewGroup?,
        savedInstanceState: Bundle?
    ): View? {
        val root: View = inflater.inflate(R.layout.fragment_sample, container, false)

        //Dialog表示ボタン
        val button: Button = root.findViewById(R.id.button)
        button.setOnClickListener {
            val newFragment = SampleDialogFragment()
            newFragment.show(childFragmentManager, "test")
        }

        return root
    }

}
SampleDialogFragment.kt
Interfaceの定義とonAttachのoverrideをしています。また、onAttach内では”parentFragment”により、listenerをセットします。
class SampleDialogFragment : DialogFragment() {
    //Listenerをセットする変数
    private lateinit var listener: CallbackListener

    //実行するメソッドを手議したInterface
    interface CallbackListener {
        fun updateButtonClickFromFragmentDialog()
    }

    //この中でListenerにセットする
    override fun onAttach(context: Context) {
        super.onAttach(context)
        try {
            //parentFragment(呼び出し元)をListenerに変換する
            val fragment = parentFragment
            listener = fragment as CallbackListener
        } catch (e: ClassCastException) {
            throw ClassCastException((context.toString() +
                    " must implement NoticeDialogListener"))
        }
    }

    override fun onCreateDialog(savedInstanceState: Bundle?): Dialog {
        return activity?.let {
            val builder = AlertDialog.Builder(it)
            val inflater = requireActivity().layoutInflater;
            val root = inflater.inflate(R.layout.dialog_sample, null)

            //viewにレイアウトをセット
            builder.setView(root)
                .setPositiveButton("OK",
                    DialogInterface.OnClickListener { dialog, id ->
                        listener.updateButtonClickFromFragmentDialog()
                    })
                .setNegativeButton("CANCEL",
                    DialogInterface.OnClickListener { dialog, id ->
                        getDialog()?.cancel()
                    })
            builder.create()
        } ?: throw IllegalStateException("Activity cannot be null")
    }
}
MainActivity.kt
Fragmentを表示するだけなので、特に処理はありません。
class MainActivity : AppCompatActivity() {
    override fun onCreate(savedInstanceState: Bundle?) {
        super.onCreate(savedInstanceState)
        setContentView(R.layout.activity_main)
    }
}
実行結果
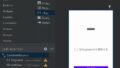
アプリ起動時
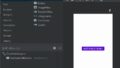
ボタンを押してダイアログを表示します。
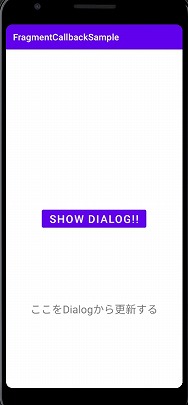
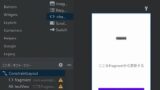
DialogFgmentのボタンを押したとき
DialogFragment内のOKボタンを押すと、下部のテキスト表示が変わっています。よって、DialogFragmentからFragmentの更新が行えていることが分かります。

まとめ
DialogからFragmentを操作する方法を説明しました。
基本的な考え方は、「FragmentからActivityを操作する」方法と同じですが、大きな違いはFragment同士で親子関係が存在するという点です。
以下の点を覚えておきましょう。
- 「(親)Fragment→(子)DialogFragment(Fragment)」の関係である(親が呼び出し元、子が呼び出し先)。
- 子Fragmentから親Fragmentを参照する場合は”parent〇〇”、親Fragmentから子Fragmentを参照する場合は”child〇〇”の属性・メソッドを参照する。